

Vivi Wu
-
Posts
124 -
Joined
-
Last visited
Content Type
Profiles
Forums
Gallery
Blogs
Events
Store
Downloads
Posts posted by Vivi Wu
-
-
Below is the tutorial for how to use the tracker on OpenXR.
Hope this will help. Thanks. -
Hi @RMFoley92,
Please help to confirm below info for us:
1. What platform are you using? Android or Windows?
2. What device and the device version are you using?
3. Is there any error code or specific problem that you encounterThanks.
-
Hi @Eswar,
Please try to use XR_HTCX_vive_tracker_interaction extension if you are using Unity engine.
We've updated the tutorial and the new SDK support will be coming soon.Thanks.
-
 1
1
-
-
What is Ultimate Tracker: https://www.vive.com/us/accessory/vive-ultimate-tracker/
System requirement:
- VIVE XR Elite FOTA 6.6 - 1.0.999.508 or later version
-
VIVE Focus 3 for VIVE Ultimate Tracker support and VIVE LBSS LBE Mode is a gradual rollout.
Please contact VIVE Support to request access.
Support Table:
Windows (PC) VR
Android (AIO) VR
Devices
VIVE Focus3 / XR Elite + VIVE Streaming
VIVE Focus3 / XR Elite
Engine
Unity
Unreal Engine
Unity
Unreal Engine
Ultimate Tracker
⬤
⬤
⬤
⬤
Body tracking extension
⬤
Android (AIO) VR Tutorial:
-
Wave
- Prerequisite: Wave SDK 5.4.0 or later version
- Use as tracker
- Body tracking
- Unity - https://hub.vive.com/storage/docs/en-us/UnityXR/UnityXRBodyTracking.html
-
OpenXR: Coming soon.
Windows (PC) VR Tutorial:
- Prerequisite: VIVE Streaming 1.3.6 / VIVE Business Streaming 1.12.8 or later version
- OpenXR:
More detail, support and troubleshooting : https://business.vive.com/us/support/ultimate-tracker/
-
Hi @FXI,
If it's PC VR (Windows platform) on OpenXR, we have different plugin versions of OpenXR.
For Metahuman please import the OpenXR for PC VR(legacy) plugin (https://developer.vive.com/resources/openxr/openxr-pcvr/download/latest/).
Then you could find the Metahuman assets and refer to the tutorial that you mentioned.
Note: Remove Wave SDK first and if you are developing an Android platform please let me know, the tutorial here is not suitable for you.The new plugin and tutorial for 2 in 1 OpenXR will be coming soon.
-
-
Introduction
The “VIVE Focus 3” and “VIVE XR Elite” provide camera passthrough features, especially “VIVE XR Elite” has a great color passthrough. More and more content developers look forward to use the camera passthrough to create an immersive MR content. Now, Vive Business Streaming brings this vivid passthrough to PC content with MR support. In this document, we would like to mention that VBS can now enable passthrough underlay on VIVE HMDs during streaming with just a click.
Content developers can effortlessly transform their content into immersive mixed reality encounters to work with VBS MR mode. By submitting alpha layer to SteamVR Runtime which many contents already support, e.g. Blender. VBS will take care of all the rest work to stream the alpha layer and blend with camera passthrough at headset side to create MR experience. PC users can now enjoy Mixed Reality contents with the high-quality color passthrough on VIVE XR Elite, also worked on VIVE Focus3.
Requirements
VIVE Streaming Hub v1.1.9 (developer only) / VIVE Business Streaming v1.11.3 or newer
Supported GPU: NVIDIA and AMD
Supported SDK: OpenVR and OpenXRTo enable MR with passthrough
-
VIVE Business Streaming:
-
Open VBS Console Settings

-
Switch to “Graphics” page and enable “MR with passthrough”
- Launch MR content and enjoy
- You can enable/disable MR mode in anytime
-
Open VBS Console Settings
-
VIVE Streaming Hub
- To enable developer mode, download devmode.jsonfile and copy to C:\Program Files\VIVE Hub\ folder.
- Start VIVE Streaming Hub, then the MR with passthrough option should be there in VIVE Streaming settings.
- Enable MR with passthrough option.
Develop your MR content for VBS
VBS extracts the alpha channel of textures of Content and use the information to blend VR texture and passthrough. If the content developers would like to mix real environment and content scene, they have to assign alpha value into the scene. Please read below steps for more details.
- The content textures format should include ALPHA layer
- The alpha value should be 0 to 1.
- To show passthrough on the HMD, please set the alpha values closed to 0 into target area in the scene.
- To show the content texture on the HMD, please set the alpha values closed to 1 into target area in the scene.
1. Content textures
2. Extracted Alpha layer texture
3. MR result from HMD
Camera setup in Unity
How to set transparent camera background in Unity:
- Select the Main Camera in the Hierarchy panel
- In the Inspector panel, find the Camera component
- Change the Clear Flags to Solid Color
-
Change Background color to RGBA values (0, 0, 0, 0)
- You can use Unity's Color.clear to set this in your code
Troubleshooting
-
If there is no passthrough textures while MR mode is enabled, how to recover?
- Please reopen the function again to check if the MR mode normal
- Please verify the alpha layer of the textures is already provided with our steps and submit to SteamVR.
-
The performance looks worse when MR mode is enabled.
- Please check the Console settings -> Graphics settings -> Streaming graphics preferences, we suggest not to use Ultra preference when MR mode is enabled due to additional encoding involved.
-
How to record the MR content result in headset?
- Please make sure “Allow passthrough recording and casting” is enable. You can find the setting from HMD’s Lobby, Settings -> Advanced -> Camera settings. When you change this item, please reboot your device.
-
VIVE Business Streaming:
-
Hi @aboutblank,
Here's the new video for new Direct Preview.
Please have a check, thanks.-
1
-
-
Hi @YangNoca,
After the computer is connected to the headset, could you check whether the "adb devices" command is valid?
If the installation is successful, the "HTC Device/VIVE RR Interface" should appear after the headset is connected.
Thanks. -
VIVE XR Elite features a powerful full-color passthrough camera and depth sensor that enable you to interact with virtual objects in your real-world space.
The following message will show you the scenario and tutorial for VIVE MR feature. Open up new possibilities in mixed reality.For the MR feature, it's supported by VIVE Wave SDK for Android development.
Passthrough
The basic MR would be the passthrough. Passthrough feature which enables an application to show the reality image to see the surrounding environment from the VR headset.
Please refer the article here:- Demonstration on how to use WAVE Passthrough Underlay/Overlay
- Passthrough Underlay
-
Adjust the quality of passthrough image
Scene perception
The scene perception is the system ability to percept environment objects like floor, ceiling, wall, desk, couch, door, window etc. The MR content which included scene elements can recognize those scene objects and interact with them to make player to immerse in the real world. Scene elements are defined as Plane 2D, Anchor, Scene mesh, and Object 3D.
-
Plane 2D: Support vertical/horizon plane and plane mesh
Tutorial : Unity, Unreal Engine
-
Scene mesh: Support visual mesh and collider mesh for room.
Tutorial : Unity, Unreal Engine
-
Anchor: A persist location in real world
Tutorial: Unity, Unreal Engine
-
 1
1
-
Hi @xrSoftware,
Are you using the default VRS Studio app on XR Elite? Or do you install it from Git ?
After our test, you can use controller by press VIVE button or use hand tracking- pinch to exit the app by calling VIVE menu.
Here's the tutorial : https://www.vive.com/us/support/vive-xr/category_howto/vive-menu.html
Let me know if you still have question. Thanks.
-
1
-
-
Unreal Engine does not provide OpenVR IVRDebug interface in SteamVRPlugin, therefore DriverDebugRequest() is not available for game project use.
What you need to do to use DriverDebugRequest() in Unreal Engine:
-
Link your Epic Games account to GitHub account and get authorized by Epic Games.
https://www.unrealengine.com/en-US/ue-on-github -
Modify and rebuilt Unreal Engine according to our GitHub repository
https://github.com/ViveSW/UnrealEngine/tree/4.27-DriverDebugRequest - You should be able to call DriverDebugRequest() from your Unreal project now!
If you want to check our sample project for a Blueprint example:
- Download sample project : UE 4.27 sample projectDDRTest_Proj.zip
-
Switch the sample project’s Unreal Engine version to your local build
-
Generate project file for sample project
- Now you can open the sample project and check Level Blueprint for the example of USteamVRFunctionLibrary::DriverDebugRequest()
Note: For debug usage, search for “DebugRequest” or “SendV2RParamToServer” In Steam/logs/vrserver.txt to check if DriverDebugRequest() works properly.
-
Link your Epic Games account to GitHub account and get authorized by Epic Games.
-
To identify if the device is lost tracking, the developer needs to use OpenVR API to get the device status.
Also if you'd like to know whether your controller / wrist tracker is in 6Dof or 3Dof status, please follow the guidelines below and refer to OpenVR GitHub for more information.Required:
- VIVE Business Streaming version : 1.10.5 or later.
-
Focus 3 – FOTA version : 5.0.999.676 or later
Check OpenVR API to get status
IVRSystem :
IVRCompositor :
-
IVRCompositor::GetLatestPoses (similar with WaitGetPoses)
Both API can get TrackedDevicePose_t of devices with parameter-“ETrackingResult”, which is the tracking status of device.
- 6Dof = TrackingResult_Running_OK
- 3Dof = TrackingResult_Fallback_RotationOnly
All of the APIs can get TrackedDevicePose_t which includes several parameters to identify the device tracking status.
- bPoseIsValid
- bDeviceIsConnected
-
eTrackingResult
- TrackingResult_Running_OK: 6DoF
- TrackingResult_Fallback_RotationOnly: 3DoF
Only the “bPoseIsValid” is true, “bDeviceIsConnected” is true and “eTrackingResult” is TrackingResult_Running_OK or TrackingResult_Fallback_RotationOnly means tracked. Otherwise, the device status should be lost tracking.
The index of each device:
To use the APIs, please use below device index for vr::TrackedDeviceIndex_t or pose array to get target device pose data.index
device
0
HMD
1
Right controller
2
Left controller
3
Right wrist tracker
4
Left wrist tracker
To access the target device and retrieve its status, please generate a large enough array and call the appropriate API. Use the index specified in the above table to obtain the status of the target device.
Sample code:
Sample 1:
vr::IVRSystem * pvr = vr::VR_Init(&eError, vr::VRApplication_Utility);
TrackedDevicePose_t result[5];
pvr->GetDeviceToAbsoluteTrackingPose(vr::TrackingUniverseStanding, 0, &result, 5);
result[1].eTrackingResult; // right controller tracking result
result[2].eTrackingResult; // left controller tracking result
result[3].eTrackingResult; // right wrist tracker tracking result
result[4].eTrackingResult; // left wrist tracker tracking result
Sample 2:
TrackedDevicePose_t result[5];
Vr::VRCompositor()->GetLatestPoses(result, 5, NULL, 0);
result[0].eTrackingResult; // HMD tracking result
result[1].eTrackingResult; // right controller tracking result
result[2].eTrackingResult; // left controller tracking result
result[3].eTrackingResult; // right wrist tracker tracking result
result[4].eTrackingResult; // left wrist tracker tracking result
-
Hi @Ryam,
Could you provide me your E-mail. We can sent you an app which build py UE4.27 with OpenXR.
You can use it to check is eye gaze on your device work or not. (Use Focus3 with VBS)
Thanks.
-
1
-
-
Hi @Ryam,
Eye gaze is provided by Unreal Engine.
Unreal engine provides the Eye Tracking feature by enabling the OpenXREyeTracker plugin from Plugin > Built-In > Virtual Reality > OpenXREyeTracker.
After enabled the Eye Tracking feature, you can access the Eye Tracking data from UEyeTrackerFunctionLibrary interface.Hope these could help you step forward. Thanks.
-
-
VIVE Tracker offers endless possibilities as a robust, unintrusive solution for adding high-precision positional tracking to any associated real-life object.
And VIVE OpenXR PC VR Plugin also support VIVE Tracker.
Here's some tutorial for VIVE Tracker:
-
What you will learn in the following tutorials:
- How to setup the VIVE Tracker on PC
- Get and setup OpenXR VIVE Tracker Plugin
-
Use VIVE Tracker in UE5 or Unity project
-
[VIVE Tracker] Using OpenXR in Unreal Engine:
For VIVE Tracker Plugin is provided by Valve, and you can download it from their GitHub Here.
Also we provide the guide here : OpenXR_VIVE_Tracker_Tutorial_for_Unreal_Engine.pdf -
[VIVE Tracker] Using OpenXR in Unity:
Here's an awesome video we found on YouTube from an enthusiastic Unity developer - VR with Andrew:
Note : If you're looking for the OpenXR tutorial for Wrist Tracker, please refer the tutorial Here.
-
What you will learn in the following tutorials:
-
You might already know VIVE Focus 3 gets Facial Tracker and Eye Tracker.
Now you can use OpenXR for mobile to create facial tracking project.
Tutorial : Getting data of Facial TrackingVIVE OpenXR for Mobile - 1.0.3 Release Information:
▪ Unity Engine Version: 2020.3, 2021.3
▪ Target Platform: Android ( arm64 ONLY )
▪ Graphics API: OpenGLES3, Vulkan
▪ OpenXR Loader Version: Khronos openxr_loader_for_android-1.0.23
Added Features:
▪ Interaction: Facial tracking
※ If you want to develop the PC VR content of Facial tracking, please visit OpenXR for PC VR facial tracking tutorial.
-
Hi Ryam,
Please update your Focus 3 Version to 5.0.999.646 and do the eye calibration on the headset setting.
Pleas check what platform are you using?
-
If you're using Windows platform.
1. Please install Runtime and joint beta.
2. Follow the tutoial here, we recomend you to use OpenXR for Windows
(Note : The latest version for OpenXR for Mobile on Unreal is 1.5.0
3. Setup the VBS -
If you're using Android platform.
Welcome to use OpenXR for mobile (Or Wave SDK)
Here's the tutorial for facial tracking
Unity : https://developer.vive.com/resources/openxr/openxr-mobile/tutorials/unity/getting-data-of-facial-tracking/
Unreal Engine : https://dl.vive.com/SDK/openxr/openXRforAIO/[ViveFocus3]Build_UE4.27_UE5.0_OpenXR_for_Wave_Runtime_v1.0.3.pdf#page=27
Thanks.
-
If you're using Windows platform.
-
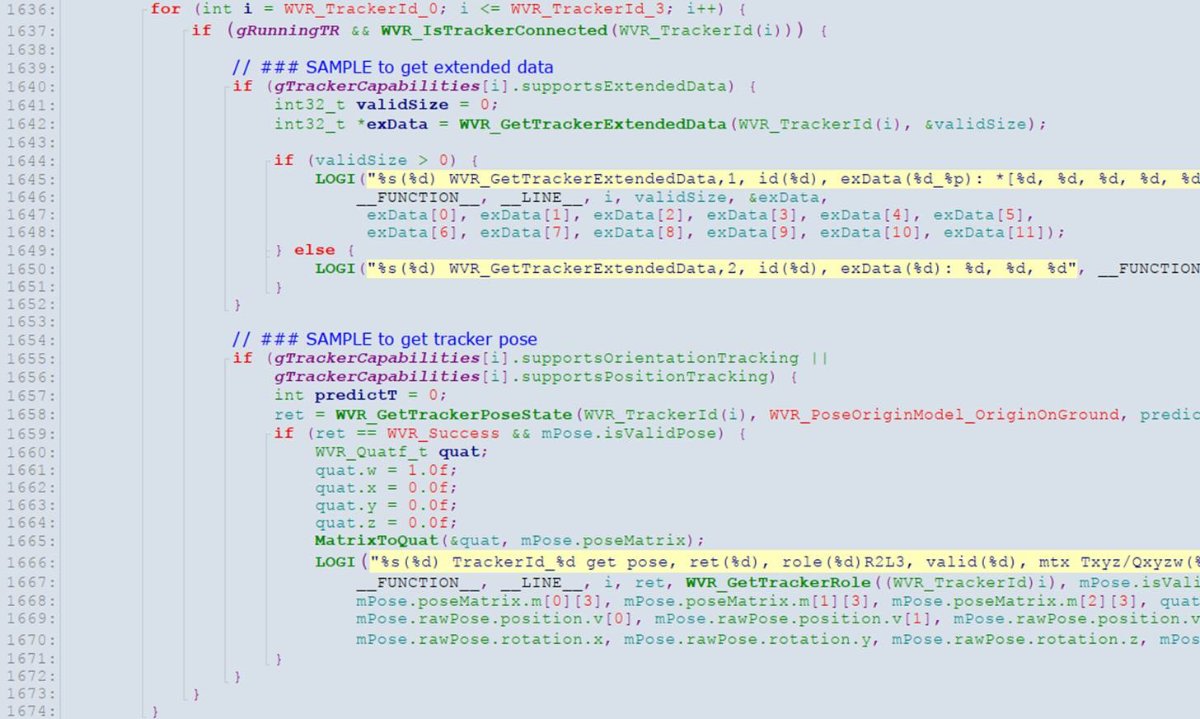
To get VIVE Tracker pose for Native support.
Download the sample code and follow the following steps.
Sample code : helloTrackerNotifyDS.cpp
Follow the steps to get tracker pose:
-
Set up feature in AndroidManifest.xml of app
-
Define global variables
-
If tracker feature is supported, call function WVR_StartTracker() to start tracker feature at the initial stage of app.
-
If the connected event has been received,
- check tracker capabilities to know what capability is supported.
-
If battery capability is supported, first get battery level of tracker
-
Other tracker related event
-
Continuously get pose data
-
Set up feature in AndroidManifest.xml of app
-
PC VR contents could now enjoy Focus 3 Facial Tracking via OpenXR Facial tracking extension or VIVE Sense - Eye and Facial Tracking.
Support information:
-
Eye gaze supported
- Support combined data and separate-eye data
-
Facial Tracking:
- Eye expression(blendshapes) supported
- Lip expression (blendshapes) supported
Prerequisite:
- Update your Focus 3 Version : 5.0.999.646 or later
-
Install SR Runtime (Please joint Beta program)
-
Install or update the latest SR Runtime included in VIVE Software form SteamVR (2.1.22.1 or later)or OOBE (2.0.22.1 or later), and check your SR_Runtime status
(SRanipal Runtime Version : 1.3.6.8 or later)
-
Install or update the latest SR Runtime included in VIVE Software form SteamVR (2.1.22.1 or later)or OOBE (2.0.22.1 or later), and check your SR_Runtime status
VBS Facial Tracking for developers
There are two open SDKs that VBS supports to bring Focus 3 Facial Tracking to PC contents.
Choose one of the plugin below to use:-
[ Recommend ] Use VIVE OpenXR PC VR
-
Install OpenXR PC VR plugin and enable Facial Tracking feature
Unity - https://developer.vive.com/resources/openxr/unity/download/latest/
Unreal Engine - https://developer.vive.com/resources/openxr/unreal/unreal-download/latest/ - Tutorials:
-
Install OpenXR PC VR plugin and enable Facial Tracking feature
-
Use VIVE Sense - Eye and Facial Tracking
-
Install Eye and Facial Tracking plugin
Install or update the Eye and Facial Tracking SDK to 1.3.6.6 or later. -
Tutorials: https://developer.vive.com/resources/vive-sense/eye-and-facial-tracking-sdk/documentation/
-
Install Eye and Facial Tracking plugin
To enable facial tracking data from AIO headset:
- Make sure the VBS version is 1.09.8 or later
-
Install VBS app in your headset
Go to VBS > Settings > About> Version> Click Install
-
2
-
Eye gaze supported
-
Hi @vethetheth,
DirectPreview haven't support hand tracking yet.
If there's any news, we'll let you know.
Thanks.
-
Hi @ForensicDJS,
If you're an Android developer. Please refer AIO (Android) / OpenXR Hand Tracking & Wrist Tracker Tutorials
The tutorial for Hand Tracking on Unreal Engine (Android) - Please refer Here
-
1
-
-
Hi @StrangerGames,
After few tests, we suspect this problem might be Unity’s issue, since it’s all working fine on UE4 OpenXR eye gaze.
We’ve reported this to Unity, and our suggestion is you can also go to Unity community to raise up.
And if there’s any new feedbacks, we'll let you know.
Thanks.
-
1
-


Focus 3 LBE tracking issues
in VIVE Focus 3
Posted
Hi @Lightshape & @Oeds,
When it shows the VIVE Logo loding icon, means still find the map.
Please make sure you are on the place that you scan your map. Also you can look around.
Make sure the HMD have collect enough featuers when you scan. This means scan more and look more while creating an LBE map.
If it still stuck in spinning logo and can not retrive positions, please contact your HTC Sales (The contact window when you purchase the VB+ license) and they would guide you to get the debug tool.